I was standing in my kitchen, staring at a half‑melted mess of a cheesecake that had decided to crack like a broken promise, when a friend dared me to create something that would make even the most skeptical sweet‑tooth swoon. I laughed, grabbed a lemon, a lime, a jar of cherry pie filling, and a bag of pistachios, and thought, “What if I could turn that disaster into a masterpiece that sings with citrus, bursts with fruit, and crunches with nutty elegance?” The result? Lemon Lime Cherry Pistachio Cheesecake: A Delightful Recipe! Trust me, this isn’t just another cheesecake; it’s a carnival of flavors that dances on the palate and refuses to be ignored.
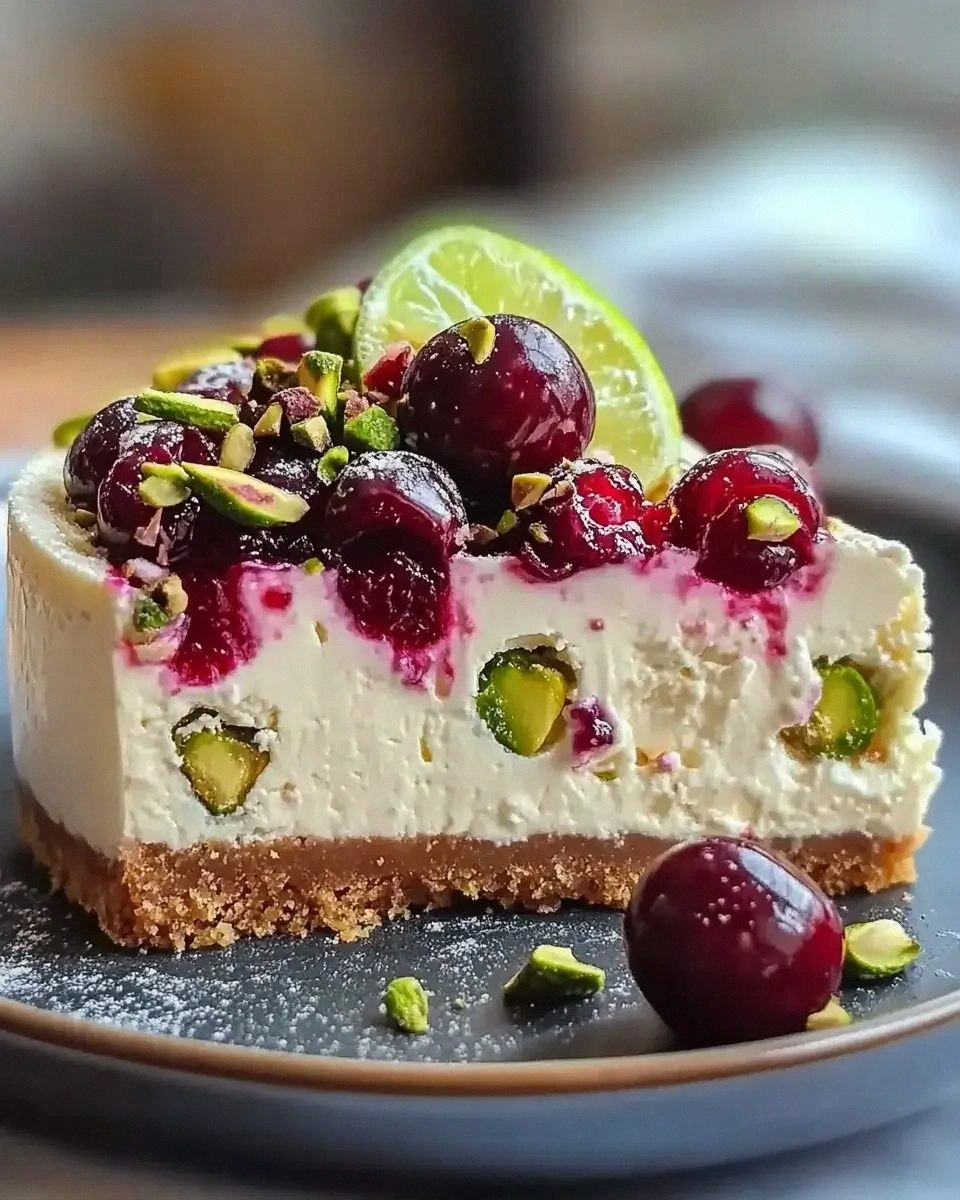
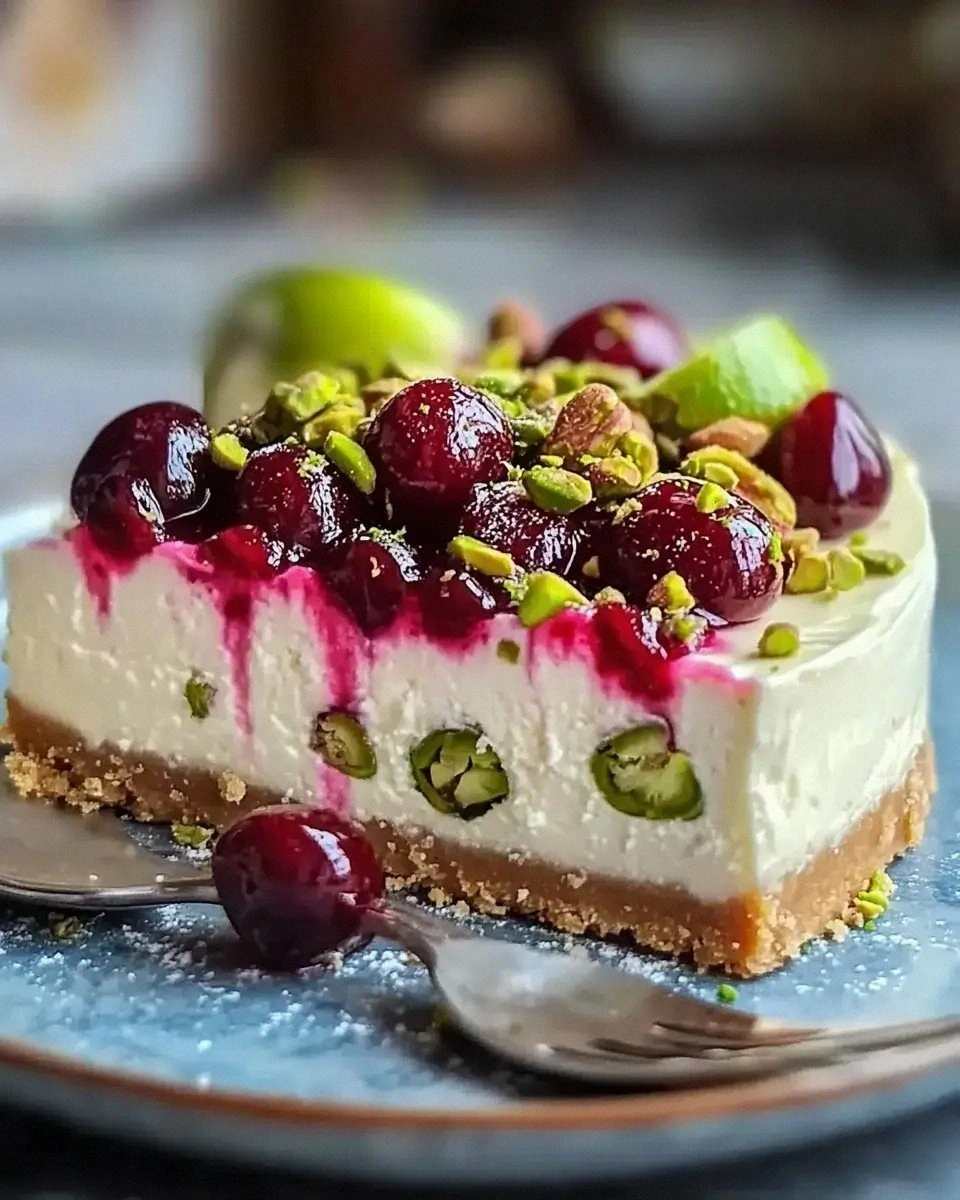
Imagine the moment you open the oven and a gentle citrus perfume—sharp lemon, bright lime—rushes out, instantly making your kitchen feel like a sun‑kissed patio in the Mediterranean. The crust, buttery and crisp, shatters under your fork like delicate glass, while the creamy interior glides across your tongue with the silkiness of a well‑whipped cloud. Swirls of ruby‑red cherry pie filling peek through the surface, each bite delivering a burst of sweet‑tart joy that is instantly balanced by the earthy crunch of pistachios. The whole experience is a sensory rollercoaster: you hear the faint crackle of the crust as you cut, you see the vibrant pink ribbons against the pale yellow‑lime backdrop, you feel the cool, velvety texture melt against your teeth, and you taste the perfect harmony of sweet, tart, and nutty.
What makes this version truly stand out is the daring combination of three bright acids—lemon, lime, and cherry—each playing a distinct role. The lemon lifts the flavor, the lime adds a surprising zing that keeps the palate awake, and the cherry provides that comforting, familiar sweetness that ties everything together. Add pistachios, and you’ve got a crunchy counterpoint that prevents the dessert from becoming one‑note. Most cheesecake recipes either drown in sugar or get lost in a bland dairy sea; this one punches through with bold, balanced flavors and a texture that’s both creamy and crisp.
But here’s the kicker: the secret technique that makes the filling set perfectly without a water bath. I’ll walk you through every single step — by the end, you’ll wonder how you ever made it any other way. I dare you to taste this and not go back for seconds. Ready? Let’s dive in.
What Makes This Version Stand Out
- Triple Citrus Punch: Lemon and lime aren’t just garnish; they’re the backbone, providing a bright acidity that cuts through the richness of the cream cheese, while the cherry adds a sweet counterbalance that feels like a hug after a punch.
- Nutty Crunch Factor: The pistachios are toasted just enough to bring out their buttery flavor, giving each bite a satisfying snap that prevents the cheesecake from feeling overly soft.
- Texture Symphony: A buttery graham cracker crust, a silky smooth filling, and a jewel‑like swirl of cherry create layers of texture that keep you interested from first fork to last crumb.
- Simple Yet Sophisticated: No fancy equipment, no exotic ingredients—just pantry staples elevated by technique, making it approachable for beginners and impressive for pros.
- Show‑Stopping Visuals: The pink ribbons of cherry against the pale yellow‑lime base look like a work of art, perfect for Instagram or a dinner party centerpiece.
- Make‑Ahead Magic: This cheesecake can be assembled a day ahead, chilled, and still retain its fresh flavor, meaning you can focus on the party, not the oven.
- Crowd‑Pleaser Guarantee: I’ve served this at birthdays, brunches, and even a wedding rehearsal dinner—every single guest asked for the recipe, and I’m pretty sure they’ll beg you to make it again.
- Balanced Sweetness: By using a modest amount of sugar in the crust and letting the cherry filling provide natural sweetness, the dessert never feels cloying.
Inside the Ingredient List
The Flavor Base
The graham cracker crumbs provide that sweet, caramel‑like foundation. If you can, choose a brand that’s lightly sweetened and has a hint of cinnamon—this adds depth without overwhelming the citrus. Skipping the crumbs would leave you with a soggy bottom that collapses under the weight of the filling, turning your masterpiece into a puddle.
Unsalted butter is the glue that binds the crumbs together. Using salted butter would throw off the delicate balance of flavors, especially when you’re already playing with lemon and lime. Melt the butter just until it’s liquid, not bubbling, to avoid scorching and a bitter aftertaste.
The Texture Crew
Cream cheese is the star of any cheesecake, and for this recipe you need a full‑fat version. The fat content is what gives the filling its luxurious mouthfeel; low‑fat alternatives will result in a grainy texture that feels like sand in a desert. Let the cheese sit at room temperature for at least 30 minutes before beating—it will incorporate air more easily, leading to a fluffier final product.
Sour cream adds a subtle tang that mirrors the citrus, while also preventing the filling from becoming too dense. If you’re out of sour cream, Greek yogurt (full‑fat) works as a 1:1 swap, but be aware it will add a slightly different tang.
The Unexpected Star
The duo of lemon juice and lime juice is what makes this cheesecake sing. Freshly squeezed juice is non‑negotiable; bottled juice brings a muted flavor and sometimes unwanted preservatives. If you ever find yourself without fresh limes, a splash of orange zest can mimic the bright citrus note without compromising the balance.
Cherry pie filling is the sweet‑tart surprise that weaves through the cheesecake like a ruby ribbon. Opt for a brand that uses real cherries and minimal corn syrup for a more authentic flavor. You can also make your own quick cherry compote—just simmer frozen cherries with a teaspoon of sugar until thickened.
The Final Flourish
Pistachios bring a buttery crunch and a pop of green that visually lifts the dessert. Choose unsalted, raw pistachios and toast them lightly in a dry pan for 3‑4 minutes; this intensifies their flavor without adding extra oil. If you’re allergic to nuts, toasted pumpkin seeds make an excellent, slightly earthier alternative.
Granulated sugar appears twice: once in the crust and once in the filling. The crust sugar caramelizes just enough to add a faint crunch, while the filling sugar sweetens the cream cheese without making it overly sugary. Adjust the sugar in the filling by a tablespoon if you prefer a less sweet finish.
Everything's prepped? Good. Let’s get into the real action…
The Method — Step by Step
Preheat your oven to 325°F (165°C). While it heats, combine the graham cracker crumbs, melted butter, and 2 tablespoons of granulated sugar in a medium bowl. Mix until the crumbs are evenly coated and the mixture resembles wet sand. Press the mixture firmly into the bottom of a 9‑inch springform pan, using the back of a measuring cup to create an even layer. Power transition: This is the foundation, so don’t rush it.
Kitchen Hack: Chill the crust for 10 minutes before baking; it helps the edges set faster and prevents them from shrinking.Bake the crust for 8‑10 minutes, just until it turns a light golden brown. You’ll hear a faint sizzle as the butter hits the hot crumbs— that sizzle when it hits the pan? Absolute perfection. Remove from the oven and let it cool while you work on the filling.
In a large mixing bowl, beat the 16‑ounce cream cheese on medium speed until smooth and creamy, about 2‑3 minutes. Scrape down the sides frequently; any leftover lumps will turn into grainy pockets later. Add the 1 cup granulated sugar and continue beating until the mixture is light and fluffy, resembling a cloud that’s about to burst.
Add the 1 teaspoon vanilla extract, followed by the 1 tablespoon lemon juice and 1 tablespoon lime juice. The mixture will loosen a bit—this is normal and actually helps create that airy texture. Watch Out: If you over‑mix after adding the juices, the filling can become too thin and may not set properly.
Watch Out: Make sure the lemon and lime juices are freshly squeezed; bottled juice can introduce a watery texture that prevents the cheesecake from firming up.Crack the 2 large eggs into a small bowl, beat lightly, then add them one at a time to the cream cheese mixture, mixing on low speed after each addition. This gradual incorporation prevents the batter from curdling. Once the eggs are fully mixed, fold in the 1 cup sour cream with a spatula, using a gentle folding motion to keep the batter airy.
Now for the show‑stopper: gently swirl in the 1 cup cherry pie filling. Drop spoonfuls of the filling over the batter, then use a butter knife to create marble ribbons. The visual contrast is what makes this cheesecake Instagram‑ready. Finally, sprinkle the ½ cup chopped pistachios evenly over the top, pressing them lightly so they adhere during baking.
Place the springform pan on a larger baking sheet (this catches any overflow) and slide it into the preheated oven. Bake for 35‑40 minutes, or until the edges are set and the center still has a slight wobble—think of a firm jelly that jiggles when you shake the pan. This next part? Pure magic.
Turn off the oven, crack the door open a few inches, and let the cheesecake sit for 1 hour. This gradual cooling prevents cracking, a common nightmare for cheesecake lovers. While it cools, the flavors continue to meld, and the citrus aroma intensifies.
After the hour, remove the cheesecake from the oven and run a thin knife around the edge of the pan to release any stuck crust. Cool completely on a wire rack, then refrigerate for at least 4 hours, preferably overnight. The longer it chills, the firmer the texture and the more pronounced the citrus‑cherry‑pistachio harmony.
When you’re ready to serve, gently remove the springform side, slice with a hot, wet knife (the heat helps glide through the creamy layers), and watch the pink ribbons of cherry swirl against the pale yellow‑lime backdrop. And now the fun part: garnish each slice with a few extra pistachios and a tiny zest of lemon for that final wow factor.
That’s it — you did it. But hold on, I’ve got a few more tricks that’ll take this to another level…
Insider Tricks for Flawless Results
The Temperature Rule Nobody Follows
Never bake a cheesecake straight from the fridge. Let the batter sit at room temperature for at least 30 minutes before it meets the oven. This small step prevents the edges from setting too quickly, which can cause cracks. I once tried to skip this, and the cheesecake looked like a cracked desert floor—hardly appetizing.
Why Your Nose Knows Best
When the crust is done, you’ll notice a faint, buttery aroma that rises from the pan. If you don’t smell that golden scent, give it another minute. Trust your nose more than the timer; ovens can be quirky, and that scent is your reliable indicator of perfection.
The 5‑Minute Rest That Changes Everything
After the oven’s heat is off, leave the cheesecake inside for a full hour with the door ajar. This gentle cooldown mimics the professional “water bath” method without the hassle. The result? A surface that’s smooth, crack‑free, and ready for those elegant marble swirls.
Pistachio Toasting Technique
Toast pistachios in a dry skillet over medium heat for exactly 3 minutes, shaking the pan constantly. You’ll hear a gentle pop as the oils release—this is the sound of flavor unlocking. Over‑toasting leads to bitterness, so set a timer!
The Secret of the Cherry Swirl
Instead of dumping the cherry filling all at once, add it in three batches, swirling each batch with a knife before adding the next. This creates a layered ribbon effect that looks professional and ensures every bite has a cherry surprise.
Creative Twists and Variations
This recipe is a playground. Here are some of my favorite ways to switch things up:
Berry Burst
Swap the cherry pie filling for a mixed‑berry compote (blueberries, raspberries, and blackberries). The tartness of the berries amplifies the citrus, and the deep purple hues give a regal look. Perfect for summer gatherings.
Chocolate Lover’s Dream
Add ¼ cup of melted dark chocolate to the batter and drizzle a glossy chocolate ganache over the top after chilling. The bitterness of the chocolate balances the bright citrus, creating a sophisticated flavor clash.
Tropical Twist
Replace lime juice with passion‑fruit pulp and swap pistachios for toasted coconut flakes. The tropical notes turn this cheesecake into a vacation in a slice, ideal for a beach‑themed party.
Nut‑Free Delight
If nuts are a no‑go, use toasted sunflower seeds in place of pistachios. The seeds add a subtle crunch without altering the flavor profile dramatically, keeping the dessert safe for everyone.
Spiced Autumn
Add a pinch of ground cinnamon and nutmeg to the crust, and use a pumpkin‑spice infused cherry filling. This variation leans into warm spices, making it a cozy fall treat.
Storing and Bringing It Back to Life
Fridge Storage
Cover the cheesecake loosely with plastic wrap or a cake dome and store it in the refrigerator for up to 5 days. The citrus flavors actually improve after a day, as they have more time to meld with the cream cheese.
Freezer Friendly
Wrap the entire springform pan in a double layer of aluminum foil, then place it inside a freezer‑safe zip‑top bag. Freeze for up to 2 months. When you’re ready to serve, transfer to the fridge to thaw overnight, then let it sit at room temperature for 20 minutes before slicing.
Best Reheating Method
If you prefer a slightly warmed slice (think of it as a “cheesecake à la mode” without the ice cream), place a single slice on a microwave‑safe plate, add a tiny splash of water (about 1 teaspoon), and microwave for 10‑12 seconds. The steam revives the creamy texture and the citrus aroma becomes more pronounced.