Introduction
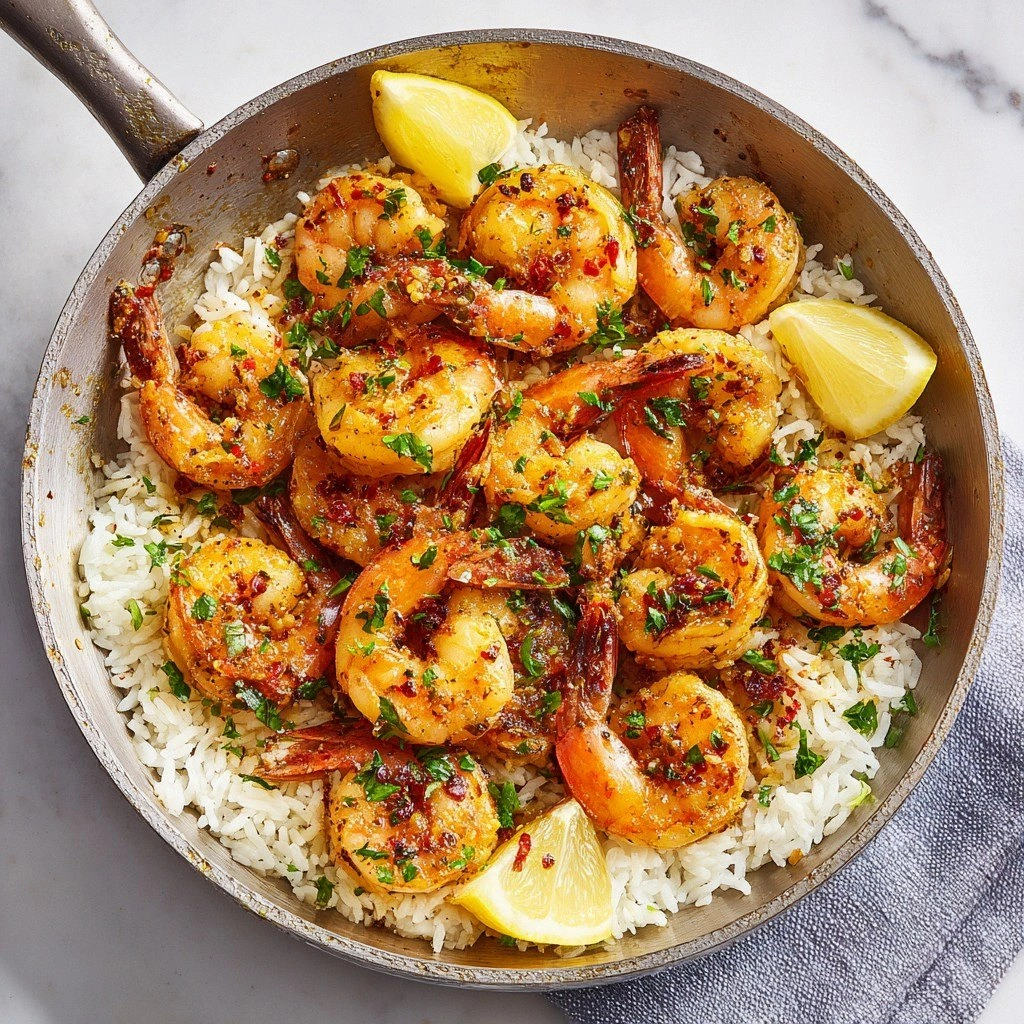
Picture this: a quiet Sunday afternoon, the kitchen lights dimming into a golden glow, and a sudden craving for something that feels both indulgent and quick. I was staring at a bag of frozen shrimp, a bottle of olive oil, and a jar of garlic, and I thought, “Why not turn this into a masterpiece?” The result? A 10‑Minute Garlic Shrimp that is so buttery, so garlicky, and so vibrant that it turns a regular dinner into a celebration.
When the shrimp hit the pan, the sizzling sound was a drumbeat that announced the arrival of flavor. The aroma of garlic roasting in butter and oil filled the room, turning the kitchen into a fragrant sanctuary. Each bite was a burst of briny sea, a whisper of citrus, and a hint of heat from the red pepper flakes, all wrapped in a glossy, silky coating that clung to the shrimp like velvet.
What makes this version stand out? It’s the balance of simplicity and sophistication. I stripped the recipe down to essential ingredients, yet the technique elevates it from ordinary to extraordinary. No fancy sauces, no long marinating times, just a few minutes of careful timing and the right touch of heat.
I dare you to taste this and not go back for seconds. This is hands down the best version you'll ever make at home. If you've ever struggled with shrimp that turns rubbery or underseasoned, you're not alone—and I've got the fix. Picture yourself pulling this out of the pan, the whole kitchen smelling incredible, and serving it with a grin that says, “I did this.” Let me walk you through every single step — by the end, you'll wonder how you ever made it any other way.
What Makes This Version Stand Out
- Flavor: The garlic and butter combo creates a rich, savory base that coats every shrimp with a silky sheen.
- Texture: Quick searing locks in moisture, giving the shrimp a tender bite while the edges crisp just enough to add contrast.
- Speed: From prep to plate in just ten minutes, it’s the ultimate go‑to for busy evenings.
- Versatility: Works beautifully with pasta, rice, or as a standalone appetizer—mix and match to suit your mood.
- Ingredient Quality: Fresh, high‑quality shrimp and garlic make all the difference; don’t skimp on these staples.
- Heat Control: The measured amount of red pepper flakes keeps the dish spicy without overpowering.
- Make‑ahead Potential: Cook the shrimp ahead, chill, then reheat quickly for a stress‑free meal.
- Presentation: A vibrant splash of lemon and parsley turns the dish into a visual feast.
Alright, let's break down exactly what goes into this masterpiece...
Inside the Ingredient List
The Flavor Base
At the heart of this dish is the classic combination of olive oil, butter, and garlic. Olive oil provides a clean, fruity backdrop, while butter adds a creamy, mellow richness that melts into the shrimp. Garlic, when minced finely, releases its aromatic oils during the sauté, infusing every bite with a punch of savory depth. Together, they create a sauce that clings to the shrimp like a second skin.
If you skip the butter, the shrimp will still cook, but the dish will feel flat and lack that luscious sheen. If you omit the garlic, you lose the signature aroma and the complex flavor profile that makes this dish memorable. For those who love a smoky edge, lightly toast the garlic in the oil before adding the butter—just until it turns golden and fragrant.
The Texture Crew
Fresh shrimp is essential for a succulent bite. Look for shrimp that are firm, translucent, and free of a greenish tint. They should snap back when pressed and not feel mushy. Shrimp that is overcooked becomes rubbery, which defeats the purpose of a quick, tender dish. Use a sharp knife to trim the tails and devein the shrimp for an elegant finish.
Red pepper flakes add a subtle heat that balances the sweetness of the garlic. If you prefer a milder dish, reduce the flakes to a pinch. A pinch of freshly cracked pepper at the end of cooking gives the shrimp a bright, peppery finish that cuts through the richness.
The Unexpected Star
Lemon juice is the unsung hero that brightens the entire plate. It cuts through the buttery richness and adds a zesty note that lifts the shrimp’s natural sweetness. A squeeze of fresh lemon, not bottled, is the best way to achieve that bright, clean citrus flavor.
Parsley is more than garnish—it brings a fresh, herbal brightness that balances the savory elements. Chop the parsley finely so it disperses throughout the dish, creating a subtle green pop that makes the dish feel lively.
Everything’s prepped? Good. Let’s get into the real action...
The Method — Step by Step
Heat a large skillet over medium‑high heat. Add the olive oil and let it shimmer until it’s just about to smoke. This temperature ensures the oil is hot enough to sear the shrimp quickly, preventing them from steaming instead of browning. The first sound you’ll hear is a gentle hiss—this is the cue to add the garlic.
Introduce the minced garlic to the pan. Stir it constantly for 30 seconds until it turns fragrant and a light golden hue appears. Be careful not to let it burn; a burnt garlic taste will ruin the dish. This is the moment of truth—watch the color, not the time.
Slide the shrimp into the skillet in a single layer. Avoid overcrowding; if the pan is too full, the shrimp will steam and lose their crisp edges. Cook for 2 minutes on one side, then flip. The shrimp should develop a caramelized pink crust, signaling that the heat is just right.
Add the butter and a pinch of red pepper flakes. As the butter melts, it will create a glossy sauce that coats the shrimp. Stir the shrimp gently to ensure even distribution of the butter and pepper flakes. The sauce should thicken slightly and become fragrant.
Squeeze fresh lemon juice over the shrimp. The acidity will brighten the dish and counterbalance the richness of the butter. Let the lemon juice bubble for about 30 seconds before turning off the heat. This brief burst of acidity locks in the shrimp’s natural juices.
Stir in the chopped parsley. The herb’s bright green color and fresh flavor will cut through the heaviness of the sauce, making each bite feel lighter and more vibrant.
Season with salt and freshly cracked pepper to taste. Remember, shrimp is naturally briny, so start with a light hand and adjust as needed. This final seasoning step ensures every shrimp is perfectly balanced.
Serve immediately over a bed of steaming pasta, fluffy rice, or a crisp green salad. The shrimp’s glossy coating will cling to the grains, delivering a burst of flavor with every bite. Garnish with an extra sprinkle of parsley or a wedge of lemon for an elegant finish.
That’s it — you did it. But hold on, I've got a few more tricks that'll take this to another level...
Insider Tricks for Flawless Results
The Temperature Rule Nobody Follows
Many cooks lower the heat to avoid burning, but this actually slows down the cooking process and can leave the shrimp underdone. Keep the skillet at medium‑high; a quick sear is key to locking in moisture. I’ve found that a hot pan also creates a beautiful caramelized crust that enhances the dish’s visual appeal.
Why Your Nose Knows Best
When the garlic starts to turn golden, that is the sweet spot. The aroma is unmistakable—sweet, nutty, and slightly sweet. Trust your nose; the scent signals that the garlic has released its oils and is ready to pair with the butter. A burnt garlic smell is a red flag that you’re overcooking.
The 5‑Minute Rest That Changes Everything
Once the shrimp are cooked, let them rest in the pan for 5 minutes before serving. This allows the flavors to meld and the heat to distribute evenly. The shrimp will finish cooking in the residual heat, ensuring they’re tender but not overdone.
Use Fresh Shrimp, Not Frozen
Frozen shrimp can be convenient, but fresh shrimp offers a superior texture and flavor. If you must use frozen, thaw them in cold water for 15 minutes, pat dry, and season immediately. Avoid thawing in warm water, which can cause the shrimp to become mushy.
Keep the Pan Clean
After adding the shrimp, don’t transfer them to another pan; cook them in the same skillet. This keeps the garlic and butter flavors concentrated and reduces cleanup. A single‑pan dish is a hallmark of a quick, fuss‑free meal.
Creative Twists and Variations
This recipe is a playground. Here are some of my favorite ways to switch things up:
Spicy Cajun Shrimp
Swap the red pepper flakes for a blend of Cajun seasoning. Add a splash of hot sauce for an extra kick. This variation is perfect for those who love a bold, smoky flavor profile.
Herb‑Infused Shrimp
Replace parsley with a mixture of fresh thyme, oregano, and basil. The herbs add a fragrant, Mediterranean vibe that pairs wonderfully with a side of couscous.
Garlic Butter Shrimp with Pasta
Serve the shrimp over linguine tossed in a light lemon‑butter sauce. Toss the pasta with a little pasta water to create a silky coating that mirrors the shrimp’s glossy sheen.
Shrimp Tacos
Use the shrimp as a filling for soft corn tortillas. Top with cabbage slaw, avocado, and a squeeze of lime for a fresh, handheld version of this classic dish.
Seafood Fusion
Combine the shrimp with scallops and a splash of white wine. Cook them together in the same garlic butter sauce for a luxurious, oceanic flavor.
Low‑Calorie Version
Use a non‑stick skillet and a teaspoon of olive oil, then finish with a light drizzle of lemon juice instead of butter. This keeps the dish flavorful while cutting down on fat.
Storing and Bringing It Back to Life
Fridge Storage
Cool the shrimp completely before transferring to an airtight container. Store in the refrigerator for up to 2 days. When ready to serve, reheat gently in a skillet over low heat, adding a splash of water or broth to keep it moist.
Freezer Friendly
Freeze the shrimp in a single layer on a parchment‑lined tray, then transfer to a freezer bag once solid. Store for up to 3 months. Thaw overnight in the fridge and reheat in a skillet with a splash of water to restore juiciness.
Best Reheating Method
Reheat on the stove over medium‑low heat, stirring frequently. Add a teaspoon of water or broth to prevent drying. A quick 2‑minute heat will bring the shrimp back to a silky, savory state.