I was halfway through a dinner party, flipping a stack of battered chicken wings when the kitchen alarm blared. The smell of burnt oil wafted across the room, and my guests started to cough. I stared at the charred wings, realizing my culinary confidence had taken a nosedive. That moment, I promised myself I would never let a disaster ruin a meal again. So I set out to create something that would turn a kitchen mishap into a crowd‑pleasing triumph.
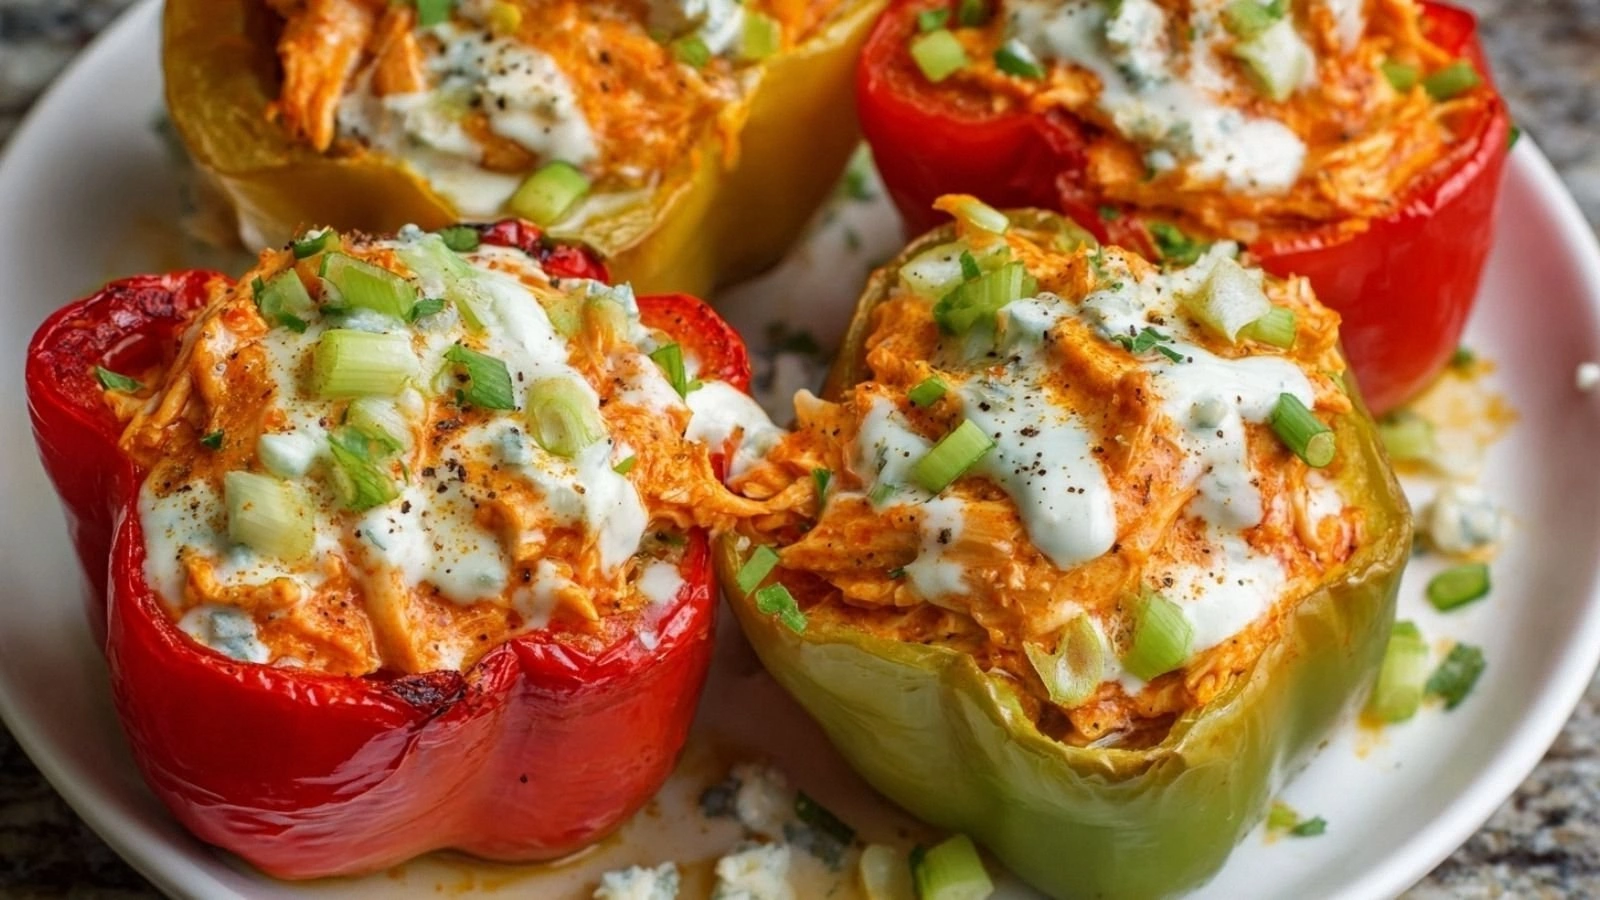
Fast forward to last night, I was craving that spicy, tangy punch of a buffalo wing, but I didn't want the guilt of deep frying. I imagined a colorful bell pepper, its crisp exterior hiding a molten, creamy filling that would make taste buds dance. The air filled with the aroma of hot sauce mingling with the buttery, velvety mayo, and a hint of garlic powder. The sight of the pepper’s bright colors was almost too pretty to eat. I could almost hear the gentle pop of the oven as it baked the peppers to perfection.
What makes this version stand out is that it marries the fiery heat of buffalo sauce with the comforting smoothness of paleo mayo, creating a flavor profile that feels like a hug in a bowl. The peppers are roasted to a subtle char, giving them a smoky depth that balances the tang. I added a splash of nutritional yeast for a savory umami kick that rounds out the heat. The final touch of fresh herbs and green onions gives it a fresh, almost garden‑fresh finish. This dish is hands down the best version you'll ever make at home.
And here's the secret twist that most people miss: I let the mixture rest for 10 minutes after baking so the flavors can meld like a slow‑moving river. The result is a sauce that coats the pepper like velvet, not just a glaze. I dare you to taste this and not go back for seconds. Picture yourself pulling this out of the oven, the whole kitchen smelling incredible, and the guests lining up for a second plate. Let me walk you through every single step — by the end, you'll wonder how you ever made it any other way.
What Makes This Version Stand Out
- Taste Explosion: The blend of buffalo sauce and paleo mayo creates a creamy heat that feels like a comforting hug with a kick. The combination of tang, heat, and a buttery undertone makes each bite a memorable experience.
- Texture Balance: The roasted bell pepper provides a satisfying crunch that contrasts with the silky filling, ensuring each bite is dynamic. The pepper’s skin crisps slightly, while the interior stays soft and moist.
- Crowd‑Pleaser Factor: Whether you’re feeding a family or a group of friends, this dish is guaranteed to become the talk of the table. The vibrant colors and bold flavor make it a show‑stopper.
- Simple Assembly: No complicated marinating or sauce‑mixing steps—just chop, fill, bake, and serve. This ease of preparation is perfect for busy evenings.
- Make‑Ahead Friendly: The peppers can be assembled and frozen, then baked straight from the freezer, saving you prep time on busy nights. This makes it ideal for meal‑prep enthusiasts.
- Ingredient Integrity: Every component is Whole30‑friendly, with no hidden sugars or artificial additives, so you can feel good about what you’re eating.
- Visual Appeal: The vibrant colors of the peppers, combined with the golden, bubbly topping, make the dish as Instagram‑worthy as it is delicious.
Inside the Ingredient List
The Flavor Base
The foundation of this stuffed pepper is the marriage of hot sauce and paleo mayonnaise. The hot sauce provides the signature fiery punch, while the mayo adds a creamy, smooth texture that tames the heat without diluting it. A dash of garlic powder and onion powder infuses the mixture with depth, creating a savory backbone that complements the pepper’s natural sweetness. If you prefer a milder bite, swap half the hot sauce for a milder sriracha or a splash of lemon juice to brighten the flavor.
The Texture Crew
Shredded chicken is the star of the filling, offering a hearty, protein‑rich base that absorbs the sauce beautifully. Nutritional yeast adds a subtle nutty flavor and a hint of cheese‑like richness without dairy, enhancing the umami profile. Green onions contribute a mild crunch and a fresh, sharp contrast to the creamy filling. Together, these elements create layers of texture that keep each bite engaging.
The Unexpected Star
Bell peppers are more than just a vessel—they bring color, crunch, and a subtle sweetness that balances the heat. Choosing a mix of red, yellow, and orange peppers not only elevates the visual appeal but also adds a spectrum of natural sugars that mellow the sauce. When roasted, the peppers develop a slight char that adds a smoky undertone, a subtle twist that elevates the overall flavor profile.
The Final Flourish
Whole30 ranch dressing is used sparingly to add a tangy, creamy finish that ties all the flavors together. A handful of fresh herbs—parsley, cilantro, or basil—provides a burst of brightness and a touch of green that makes the dish feel fresh and alive. A drizzle of olive oil before baking helps the peppers crisp up just enough for a satisfying bite. This finishing touch ensures the dish feels complete and polished.
Everything's prepped? Good. Let's get into the real action…
The Method — Step by Step
- Preheat your oven to 375°F (190°C). While the oven warms, slice the tops off the bell peppers, carefully remove the seeds and membranes, and set the peppers aside. Rinse them under cool water and pat dry with a clean towel. This ensures the peppers will hold their shape during baking. As you do this, notice how the bright colors pop against the countertop.
- In a large bowl, combine the shredded chicken, hot sauce, paleo mayo, garlic powder, onion powder, kosher salt, and black pepper. Stir until the chicken is evenly coated, making sure every strand is drenched in the fiery mixture. The smell of the sauce will start to dance in the air, signaling that the flavor is taking shape.
- Fold in the nutritional yeast, green onions, and a handful of chopped fresh herbs. The yeast will give the filling a subtle umami depth, while the herbs add brightness. Mix gently to distribute the herbs without bruising them. This step is crucial for the final burst of freshness.
- Spoon the mixture into each pepper cavity, filling them almost to the top. Press the filling down slightly to remove air pockets, ensuring the peppers bake evenly. If you find the filling too thick, add a splash of water or chicken broth to loosen it.
- Place the stuffed peppers in a baking dish and drizzle a light sheen of olive oil over the tops. This helps the peppers develop a subtle crispness and a golden finish. Cover the dish with foil to trap steam, preventing the peppers from drying out during the initial baking phase.
- Bake for 20 minutes, then remove the foil and continue baking for an additional 10–12 minutes, or until the peppers are tender and the tops are lightly browned. The edges of the peppers should start to pull away slightly, indicating they’re perfectly cooked. The aroma will intensify, making the kitchen feel like a small, spicy paradise.
- While the peppers finish baking, prepare a small bowl of Whole30 ranch dressing to drizzle over the top once the peppers are removed from the oven. The ranch adds a tangy, creamy contrast that balances the heat. If you prefer a lighter finish, reduce the amount of dressing or use a yogurt‑based alternative.
- Let the stuffed peppers rest for 10 minutes on a cutting board. This resting period allows the flavors to meld and the heat to settle, resulting in a more cohesive taste. The peppers will be slightly warmer, making them even more inviting to the eye.
- Serve hot, garnished with extra fresh herbs and a sprinkle of nutritional yeast. Pair with a crisp green salad or roasted veggies for a balanced meal. The combination of heat, creaminess, and fresh herbs makes this dish unforgettable. Enjoy the applause from your guests as they dig in.
That's it — you did it. But hold on, I've got a few more tricks that'll take this to another level…
Insider Tricks for Flawless Results
The Temperature Rule Nobody Follows
Many chefs bake stuffed peppers at a higher temperature, thinking it speeds up the process. In reality, a moderate 375°F (190°C) gives the peppers time to soften without drying out the filling. The gentle heat ensures the hot sauce melds with the mayo, creating a silky coating that clings to the pepper walls. If you’re using a convection oven, reduce the temperature by 25°F to avoid overcooking.
Why Your Nose Knows Best
Before you even taste the dish, inhale deeply. The aroma of roasted peppers, garlic, and hot sauce will give you a preview of the flavor profile. If the scent leans too much toward char, it’s a sign the peppers are overcooked. Trust your nose; it’s a reliable guide to achieving the perfect bite.
The 5‑Minute Rest That Changes Everything
After removing the peppers from the oven, let them sit for 5 minutes. During this time, the heat continues to circulate, allowing the sauce to thicken slightly and the flavors to integrate. A friend once skipped this step and found the peppers too watery. The rest period is a small sacrifice for a big payoff.
Use Fresh Chicken, Not Leftover
While leftover rotisserie chicken is convenient, fresh chicken has a superior texture and flavor profile. Grilling or roasting fresh chicken with a pinch of salt and pepper before shredding ensures it stays moist and flavorful. If you’re short on time, pre‑shredded chicken works, but be sure it’s fresh‑looking.
Keep the Peppers Moist
During baking, the peppers can dry out if the dish isn’t covered. Use foil for the first 20 minutes to trap steam, then remove it to allow the tops to brown. If you notice the peppers becoming too dry, splash a little water or broth into the baking dish before covering.
Creative Twists and Variations
Cheesy Buffalo Surprise
Swap the paleo mayo for a blend of cream cheese and a splash of hot sauce, then sprinkle shredded cheddar on top before baking. The cheese melts into a gooey, tangy layer that adds richness. This version is perfect for those who love a classic buffalo flavor with a creamy twist.
Low‑Calorie Lightness
Use Greek yogurt in place of mayo for a lower‑fat alternative, and reduce the hot sauce to a milder 1/4 cup. The yogurt provides a tangy base that keeps the dish light without sacrificing flavor. This variation is ideal for calorie‑conscious diners who still crave a spicy kick.
Veggie‑Rich Power Bowl
Fill the peppers with a mixture of shredded chicken, sautéed spinach, diced tomatoes, and black beans. Top with a drizzle of cilantro lime dressing for a fresh, zesty finish. This version turns the stuffed pepper into a complete, balanced meal, perfect for a quick weeknight dinner.
Garnish Glory
Add a crunchy element by topping the finished peppers with crushed tortilla chips or a sprinkle of chopped almonds. The crunch contrasts with the soft filling and adds a textural dimension. It also gives the dish an unexpected, celebratory feel.
Spicy Breakfast Kick
Serve the stuffed peppers over a bed of scrambled eggs, then drizzle with hot sauce and a spoonful of ranch dressing. The combination of savory eggs and spicy peppers creates a breakfast that feels like a hearty lunch. This twist is great for brunch gatherings or a lazy Sunday morning.
Storing and Bringing It Back to Life
Fridge Storage
Store leftover stuffed peppers in an airtight container for up to 3 days. The peppers will retain their moisture, and the filling will stay flavorful. When ready to eat, reheat in the microwave for 2 minutes or until warmed through, then garnish with fresh herbs for a fresh finish.
Freezer Friendly
For longer storage, place each stuffed pepper in a freezer bag or an airtight container, and freeze for up to 2 months. Thaw overnight in the refrigerator before reheating. The peppers will maintain their texture, and the sauce will re‑emulsify nicely when warmed.
Best Reheating Method
Reheat frozen or refrigerated peppers in a preheated oven at 350°F (175°C) for 15–20 minutes, or until the filling is hot and bubbly. Alternatively, use a microwave with a splash of water to keep the peppers moist. Finish with a fresh drizzle of ranch dressing to revive the creamy component.