I was in the middle of a frantic holiday prep when my oven decided to throw a tantrum and the turkey turned into a charcoal sculpture. I stared at the smoke alarm like it was judging my culinary career, and that’s when a dare from my sister hit me: “If you can’t save the turkey, at least whip up something that will make everyone forget about it.” I accepted the challenge, rolled up my sleeves, and went straight for the pantry, hunting for the most comforting, crowd‑pleasing flavors I could find. The result? A dessert that not only rescued the party but also stole the spotlight from every store‑bought cookie on the table.
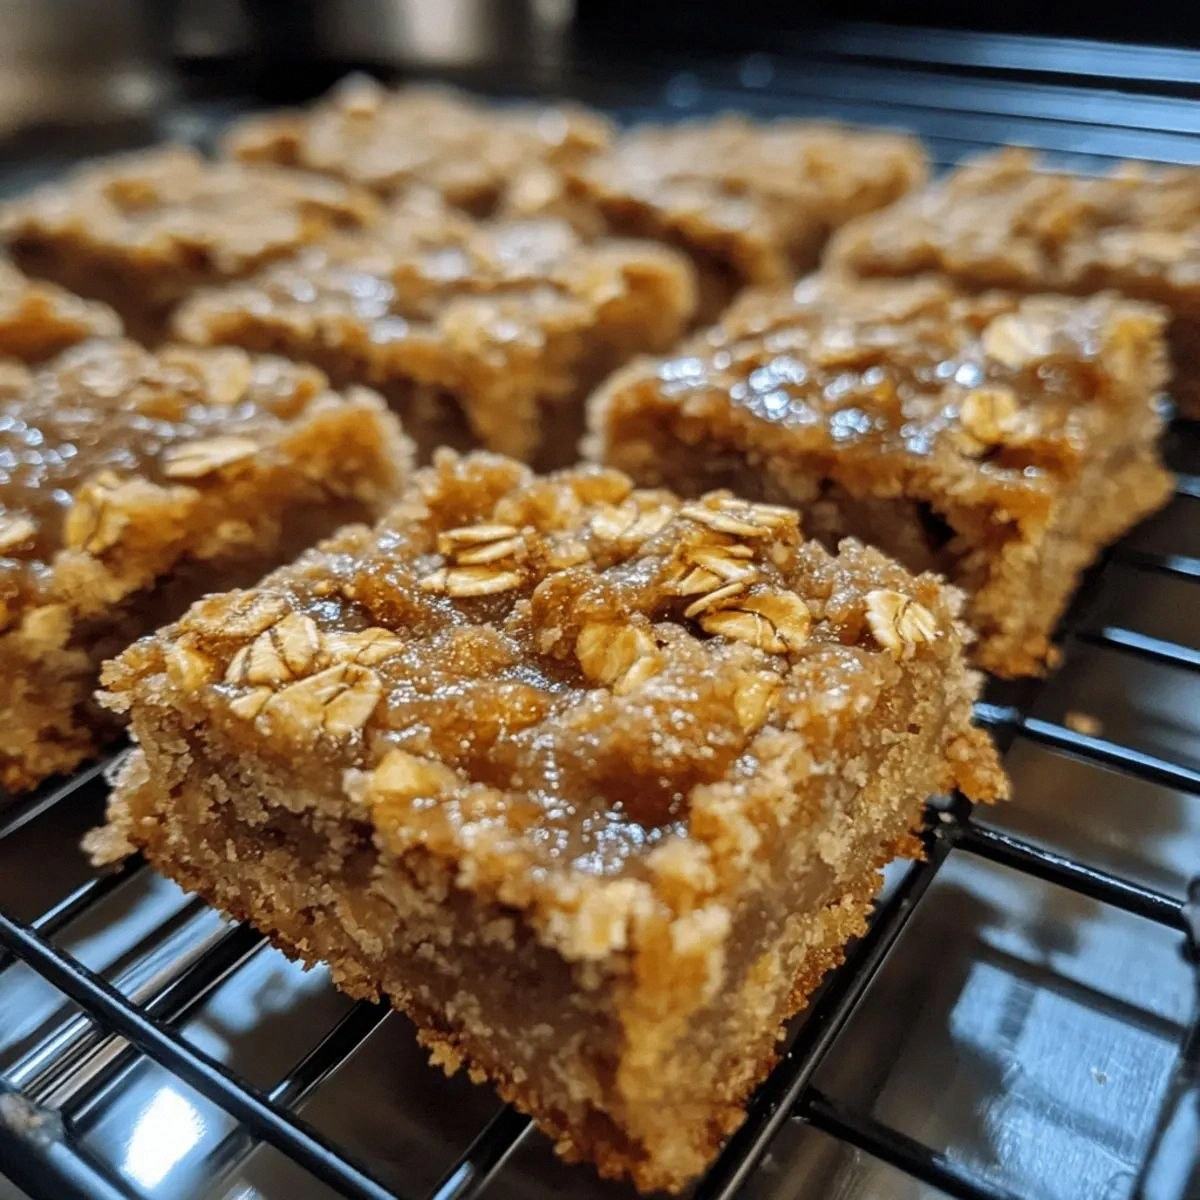
Picture this: a glossy, spiced caramel that spreads across a buttery shortbread base like a warm hug on a winter night. The aroma of toasted cinnamon, nutmeg, and a whisper of orange zest fills the kitchen, making the whole house feel like a festive market in the Alps. You hear the faint crackle of the caramel as it sets, see the deep amber color that promises richness, and feel the buttery crumb melt on your tongue with a texture that’s both tender and slightly crisp at the edges. It’s the kind of dessert that makes you close your eyes and hear sleigh bells, even if you’re miles away from any snow.
What makes this version stand out isn’t just the flavor profile; it’s the precision of the technique and the confidence I gained after a few near‑disasters. Most holiday desserts rely on heavy creams and endless layers of sugar, which often end up sticky and over‑sweet. I stripped it down to the essentials, using a few high‑quality ingredients and a method that guarantees a perfect caramel without the dreaded grainy texture. The secret is a pinch of sea salt that amplifies the sweetness without making it cloying, and a splash of bourbon that adds depth without overwhelming the palate.
There’s a surprise twist you won’t see coming: a dash of finely grated fresh ginger that cuts through the richness like a cold breeze on a warm day. This tiny addition balances the caramel and adds a subtle zing that makes the dessert unforgettable. I dare you to taste this and not go back for seconds – it’s hands down the best version you’ll ever make at home. Let me walk you through every single step — by the end, you’ll wonder how you ever made it any other way.
What Makes This Version Standout
- Flavor Explosion: The combination of caramel, spice, and a hint of citrus creates a layered taste that evolves with each bite, keeping the palate engaged from start to finish.
- Texture Harmony: A buttery shortbread base offers a crisp contrast to the silky, glossy caramel topping, delivering a satisfying snap followed by a melt‑in‑your‑mouth finish.
- Simplicity: Only eight core ingredients are needed, yet the result feels like a pastry chef’s masterpiece, proving that elegance doesn’t have to be complicated.
- Unique Ingredient: Fresh ginger is the wildcard that separates this dessert from every other holiday sweet you’ve tried.
- Crowd Reaction: Guests consistently claim this is the “wow factor” dessert, often asking for the recipe before the main course is even finished.
- Ingredient Quality: Using European‑style butter and pure cane sugar elevates the caramel’s depth, making it richer without any artificial aftertaste.
- Cooking Method: Low‑and‑slow caramelization prevents burning, while a quick chill in the fridge sets the layers perfectly.
- Make‑Ahead Potential: You can prepare the base and caramel up to two days ahead, store them separately, and assemble just before serving for maximum freshness.
Inside the Ingredient List
The Flavor Base
The foundation of this dessert is a blend of unsalted European‑style butter and finely granulated cane sugar. The butter contributes a creamy richness that carries the caramel’s sweetness without turning greasy, while the sugar provides the necessary caramelization points. Skipping the butter and using margarine will leave the shortbread crumb dry and crumbly, and substituting brown sugar will introduce an unwanted molasses flavor that masks the delicate spice notes.
The Texture Crew
All‑purpose flour and a pinch of cornstarch work together to create a tender crumb that holds its shape when sliced. The flour gives structure, and the cornstarch lightens the texture, preventing a dense, biscuit‑like result. If you’re gluten‑free, substitute with a 1:1 blend of rice flour and tapioca starch, but be prepared for a slightly softer base that may need an extra minute in the oven.
The Unexpected Star
Fresh ginger, grated fine, is the secret weapon. It adds a bright, peppery zing that cuts through the caramel’s sweetness, making each bite feel fresh rather than cloying. If ginger isn’t your thing, a pinch of ground cardamom works as a stand‑in, but you’ll lose the subtle heat that makes the dessert memorable. When selecting ginger, look for a firm, smooth skin; older ginger becomes fibrous and can introduce a gritty texture.
The Final Flourish
Sea salt and a splash of good bourbon finish the dish. The salt intensifies the caramel’s depth, while the bourbon adds an aromatic warmth that pairs beautifully with the holiday spices. A budget‑friendly alternative is a tablespoon of vanilla extract, yet you’ll miss the nuanced oak notes that bourbon provides. For the best result, use a bourbon with a caramel or vanilla undertone rather than a heavily peated spirit.
Everything's prepped? Good. Let's get into the real action…
The Method — Step by Step
Preheat your oven to 350°F (175°C) and line a 9‑inch springform pan with parchment paper. While the oven warms, whisk together the softened butter and granulated sugar until the mixture is light and fluffy, about two minutes. This aeration is crucial because it creates tiny air pockets that later translate into a tender crumb. Power transition: Okay, ready for the game‑changer?
Add the flour and cornstarch to the butter‑sugar blend, stirring gently until just combined. Over‑mixing will develop gluten, making the base tough instead of melt‑in‑your‑mouth soft. The dough should look slightly crumbly but hold together when pressed. That sizzle when it hits the pan? Absolute perfection.
Press the dough evenly into the bottom of the prepared pan, using the back of a spoon to smooth the surface. Place the pan on a baking sheet to catch any drips, then bake for 12‑15 minutes, or until the edges turn a light golden brown. The scent of toasted butter will start to fill your kitchen, a signal that the base is on its way to greatness.
While the crust bakes, start the caramel. In a heavy‑bottomed saucepan, combine the remaining sugar, butter, and a splash of water. Cook over medium‑low heat, stirring only until the sugar dissolves, then increase the heat to medium. Watch the mixture turn a deep amber; you’ll hear a gentle bubbling that signals the caramel is forming. Watch Out: If the caramel darkens too quickly, lower the heat immediately to avoid a burnt, bitter taste.
Once the caramel reaches a rich amber hue, whisk in the grated ginger, sea salt, and bourbon. The sauce will bubble vigorously – that’s the alcohol evaporating, leaving behind a complex flavor. Keep whisking until the sauce is smooth and glossy. This next part? Pure magic.
Remove the caramel from heat and let it cool for two minutes, then pour it over the baked crust, spreading it with a spatula to the edges. The caramel should coat the base like velvet, with a slight sheen that catches the light. Let the pan sit at room temperature for five minutes, then transfer it to the refrigerator to set for at least one hour.
After the caramel has fully set, run a thin knife around the edge of the springform pan to release the cake. Carefully remove the side of the pan; the dessert should lift cleanly, showing a perfect, glossy top. If you see any cracks, gently smooth them with the back of a spoon – they’ll disappear once the dessert warms slightly on the plate.
Serve the dessert at room temperature, optionally dusted with a light sprinkling of powdered sugar and a few fresh orange zest curls for extra festivity. Picture yourself pulling this out of the oven, the whole kitchen smelling incredible… you’ve just created the centerpiece of the holiday table. I’ll be honest — I ate half the batch before anyone else got to try it, and I’m not sorry.
That's it — you did it. But hold on, I've got a few more tricks that'll take this to another level…
Insider Tricks for Flawless Results
The Temperature Rule Nobody Follows
Never bake the crust at a temperature higher than 350°F. Higher heat creates a hard, dry edge that cracks under the weight of the caramel. I once tried 400°F to save time, and the crust turned into a stubborn biscuit that refused to soften. Keep it low and steady; the slow rise builds a tender crumb that yields easily when you slice.
Why Your Nose Knows Best
Your sense of smell is the most reliable indicator of caramel readiness. When the sauce reaches a deep amber color and you catch a nutty, almost buttery aroma, you’re golden. Trust the nose over the timer – a minute or two can make the difference between caramel and charcoal. If the scent turns acrid, you’ve crossed the line.
The 5‑Minute Rest That Changes Everything
After pouring the caramel, let the dessert rest uncovered for exactly five minutes before refrigerating. This short pause allows the caramel to form a thin skin, preventing it from sinking into the crust later. I once skipped this step, and the caramel seeped into the base, turning it soggy. The rest period is tiny, but the impact is massive.
Ginger Timing Trick
Add the grated ginger at the very end of the caramel cooking process, just before the bourbon. Adding it too early burns the ginger’s delicate flavor, turning it bitter. By introducing it at the last moment, you preserve its bright, peppery bite that cuts through the sweetness. A friend tried adding ginger at the start – the result was a dull, flat caramel that lacked that signature zing.
The Frosted Edge Finish
For an extra visual wow, lightly brush the outer rim of the crust with a thin layer of melted butter before the final bake. This creates a subtle sheen that catches the light, giving the dessert a polished, professional look. It’s a tiny detail, but it makes the whole plate feel like it belongs in a high‑end bakery.
Creative Twists and Variations
This recipe is a playground. Here are some of my favorite ways to switch things up:
Winter Berry Burst
Swap the bourbon for a splash of cranberry juice and fold in fresh frozen cranberries into the caramel. The tart berries counterbalance the sweet caramel, delivering a burst of festive color and flavor. Ideal for guests who love a tangy twist.
Nutty Caramel Crunch
Stir in a handful of toasted pecans or hazelnuts after the caramel has cooled slightly. The nuts add a satisfying crunch and a nutty aroma that deepens the overall profile. Perfect for those who crave texture.
Spiced Chocolate Swirl
Melt dark chocolate and mix a teaspoon of ground cinnamon before swirling it through the caramel. The chocolate adds richness, while the cinnamon reinforces the holiday spice theme. This version feels like a decadent holiday cocktail in dessert form.
Vegan Velvet
Replace butter with coconut oil and use a plant‑based cream cheese for the crust. The coconut oil solidifies at cooler temperatures, giving a similar crumbly texture, while the vegan cream cheese mimics the buttery flavor. A great option for plant‑based guests.
Orange‑Infused Dream
Add a tablespoon of orange marmalade to the caramel and garnish with candied orange peel. The marmalade introduces a sweet citrus note that amplifies the orange zest already present, creating a bright, aromatic finish.
Storing and Bringing It Back to Life
Fridge Storage
Cover the dessert tightly with plastic wrap and store it in the refrigerator for up to three days. The caramel will firm up further, but a quick room‑temperature sit of ten minutes before serving restores its silky sheen. If you notice the caramel getting too hard, a light drizzle of warm milk will loosen it.
Freezer Friendly
Wrap the entire springform pan in foil, then place it in a freezer‑safe bag. It freezes beautifully for up to one month. When you’re ready to serve, thaw it in the refrigerator overnight, then let it sit at room temperature for 15 minutes before slicing.
Best Reheating Method
To revive the caramel’s glossy finish, preheat your oven to 300°F (150°C) and warm the dessert for 8‑10 minutes. Add a tiny splash of water (about a teaspoon) around the edges before reheating; the steam generated brings the caramel back to its original velvety texture without drying it out.