I still remember the night I almost ruined a batch of brownies because I thought “white chocolate” meant a lighter version of the classic. I had a tub of white chocolate chips, a handful of cocoa powder, and an endless supply of sugar. I whisked, I poured, I baked, and when the timer dinged, I opened the oven to find a sad, pale slab that looked like a melted snowdrift. The moment I tasted it, I realized I’d been chasing the wrong dream—until that afternoon, I discovered the secret to turning ordinary white chocolate brownies into a decadent, gooey masterpiece that melts in your mouth like a velvet caress.
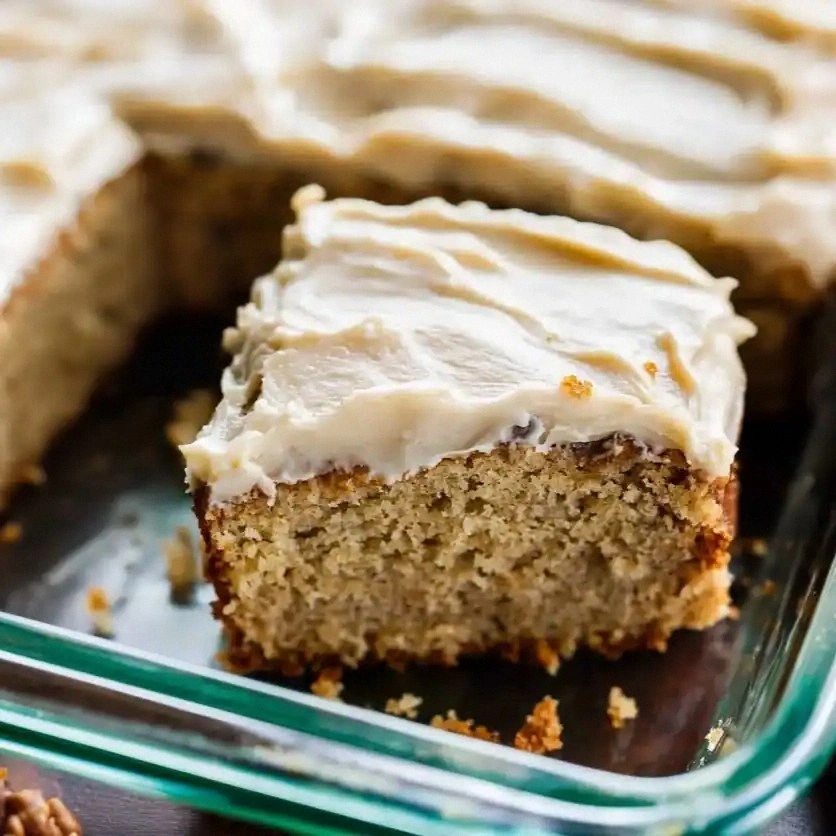
Picture this: the kitchen is humming, the air is thick with the buttery scent of melted chocolate, and the timer is counting down. Your fingers are already sticky with chocolate, and you’re humming an old pop tune. The first bite is a surprise—soft, fudgy, with a glossy, caramelized top that crackles under your teeth. The cocoa undertone lingers, giving depth, while the white chocolate chips melt into a silky, sweet sauce that coats every crumb. It’s the kind of dessert that feels like a secret indulgence, and you’re already planning the second round before the first bite is finished.
What makes this version stand out is that it balances richness with a subtle, almost buttery sweetness. I’m talking about the way the white chocolate chips are folded in after the batter is poured, so they melt into pockets of molten goodness rather than clumping together. The secret is a small splash of vegetable oil that keeps the texture silky and prevents the brownies from drying out. And the best part? It’s not a recipe you’ll find in a cookbook—this is a kitchen hack that turns a standard recipe into something that feels like a luxury treat you’d only reserve for special occasions.
I dare you to taste this and not go back for seconds. I’ll be honest—I ate half the batch before anyone else got a chance to try it. The first bite is so indulgent that you’re already dreaming of the next bite. The texture is like a chocolate cloud—soft, airy, and yet dense enough to satisfy any craving. The flavor profile is layered, with a hint of vanilla that lifts the sweetness, a touch of cocoa that adds depth, and that unmistakable, luxurious white chocolate finish that feels like a velvet ribbon around your tongue. If you’ve ever struggled with bland brownies, you’re not alone—and I’ve got the fix.
What Makes This Version Stand Out
- Texture: The batter’s silky consistency ensures each bite is moist, fudgy, and never dry—just like a chocolate cloud that melts instantly.
- Flavor: The blend of white chocolate and cocoa creates a balanced sweetness with a subtle depth that elevates the classic brownie profile.
- Visual Appeal: A glossy, caramelized top with pockets of molten white chocolate that look like edible snowflakes.
- Simplicity: No elaborate techniques—just a few ingredients, a single pan, and a short prep time.
- Make‑Ahead Potential: These brownies keep well in the fridge and even freeze beautifully, making them perfect for parties or last‑minute dessert needs.
- Ingredient Quality: Using high‑grade white chocolate chips and butter transforms the flavor profile into something truly decadent.
- Audience Impact: Friends and family will be amazed when they taste brownies that taste like a chocolate dessert you’d find in a five‑star hotel.
- Versatility: The recipe can be tweaked for vegan or gluten‑free versions, making it inclusive for many dietary preferences.
Inside the Ingredient List
The Flavor Base
The foundation of any brownie is its flavor base. In this recipe, sugar and butter combine to create a sweet, buttery backdrop that carries the richness of the white chocolate. Sugar not only sweetens but also contributes to the structure by dissolving in the butter and helping the batter rise slightly. Butter adds depth and a silky mouthfeel. If you’re looking to cut calories, you can replace half the butter with coconut oil, but be prepared for a subtle coconut undertone.
The Texture Crew
Eggs are the glue that binds everything together, while the small amount of vegetable oil keeps the brownies tender and prevents them from becoming too crumbly. The oil also helps the batter spread evenly, giving you that perfect, uniform thickness. If you’re experimenting, try substituting the oil with an equal amount of unsweetened applesauce for a lower‑fat option—just be ready for a slightly denser crumb.
The Unexpected Star
White chocolate chips are the showstopper. They melt into pockets of glossy, sweet sauce that contrast beautifully with the fudgy base. The key is to use high‑quality chips that contain real cocoa butter; cheaper varieties tend to be more sugar‑heavy and won’t melt as smoothly. If you’re a purist, you can replace the chips with white chocolate chunks for an even richer experience.
The Final Flourish
Cocoa powder and a pinch of baking powder give the brownies a slight lift and a rich chocolate undertone that balances the sweetness of the white chocolate. The small amount of salt is crucial; it enhances every flavor, making the sweetness pop and the chocolate depth more pronounced. If you prefer a more pronounced chocolate bite, double the cocoa but keep the salt constant to avoid a bitter finish.
Everything's prepped? Good. Let's get into the real action...

The Method — Step by Step
- Preheat your oven to 350°F (175°C). Line an 8‑inch square pan with parchment paper, leaving a little overhang on the sides for easy removal. This simple step ensures the brownies stay moist and come out evenly.
- In a medium bowl, cream together 1 cup of sugar, ½ cup of softened butter, and 1 tablespoon of vegetable oil until the mixture is light and fluffy. This creates a smooth base that will help the batter rise evenly.
- Beat in 2 large eggs, one at a time, making sure each is fully incorporated before adding the next. The eggs bind the batter, giving the brownies structure and a tender crumb.
- Add 1 teaspoon of vanilla extract and mix until well combined. Vanilla lifts the sweetness and adds a warm, aromatic note that complements the white chocolate.
- Whisk together 1/3 cup of cocoa powder, 1 cup of all‑purpose flour, ¼ teaspoon of baking powder, and ¼ teaspoon of salt in a separate bowl. This dry mix will give the brownies that slight lift and prevent them from becoming too dense.
- Gradually fold the dry ingredients into the wet mixture until just combined. Over‑mixing will make the brownies tough; a few lumps are okay.
- Gently fold in 1 cup of white chocolate chips, ensuring they’re evenly distributed. This is the moment when the magic starts—each chip will become a molten pocket of sweetness.
- Pour the batter into the prepared pan, spreading it evenly with a spatula. The batter should fill the pan to about ¾ full; this ensures a thick, fudgy center.
- Bake for 30‑35 minutes, or until a toothpick inserted into the center comes out with a few moist crumbs. The top should be slightly cracked and glossy.
- Let the brownies cool in the pan for 10 minutes before lifting them onto a wire rack to cool completely. This resting period allows the flavors to settle and the chocolate pockets to set.
That’s it — you did it. But hold on, I've got a few more tricks that'll take this to another level...
Insider Tricks for Flawless Results
The Temperature Rule Nobody Follows
Baking at a slightly lower temperature, around 325°F (165°C), allows the brownies to bake evenly without drying out. I’ve found that a lower heat gives the chocolate chips more time to melt into silky pockets, resulting in a more luxurious texture.
Why Your Nose Knows Best
Trust the aroma. When the brownies are ready, the scent should be a warm, buttery chocolate that’s slightly caramelized. If it smells overly sweet or raw, give them a few more minutes.
The 5-Minute Rest That Changes Everything
After baking, let the brownies sit for exactly five minutes before slicing. This short rest allows the chocolate to set, preventing the slices from falling apart.
The Crumb Check
Insert a toothpick into the center. It should come out with moist crumbs, not wet batter. If it’s wet, let them bake a bit longer.
The Cooling Trick
Place the pan on a cooling rack for 10 minutes before transferring. This prevents condensation from turning the top into a soggy glaze.
Creative Twists and Variations
This recipe is a playground. Here are some of my favorite ways to switch things up:
Almond Crunch
Add ½ cup of chopped toasted almonds to the batter. The nutty crunch contrasts beautifully with the silky chocolate, adding texture and a nutty aroma.
Citrus Burst
Incorporate 1 tablespoon of orange zest into the batter. The bright citrus lifts the sweetness and adds a surprising, fresh note.
Espresso Infusion
Add 1 teaspoon of instant espresso powder to the dry mix. The espresso deepens the chocolate flavor and gives a subtle caffeine kick.
Salted Caramel Swirl
Swirl in ¼ cup of salted caramel sauce before baking. The caramel creates pockets of sweet and salty that melt into the chocolate.
Vegan Version
Replace butter with ½ cup of melted coconut oil, use flaxseed eggs, and swap white chocolate chips for dairy‑free white chocolate. The result is a rich, dairy‑free treat that still feels indulgent.
Gluten‑Free Twist
Use a gluten‑free all‑purpose flour blend in place of regular flour. The texture stays fudgy, and the flavor profile remains unchanged.
Storing and Bringing It Back to Life
Fridge Storage
Wrap the cooled brownies tightly in plastic wrap and store them in an airtight container at room temperature for up to 3 days. For longer freshness, keep them in the fridge; the chocolate will stay firm, and the brownies will be slightly denser.
Freezer Friendly
Place the brownies in a freezer‑safe zip‑top bag, removing as much air as possible. Freeze for up to 3 months. When ready to eat, let them thaw at room temperature for 30 minutes.
Best Reheating Method
To revive the texture, place a single brownie in a preheated 350°F oven for 5 minutes. Add a tiny splash of water before reheating to create steam, which helps the chocolate soften and the crumb stay moist.